Delicious Cooking Recipes

Get Delicious Cooking Recipes Here For Free

Breaking

Thursday, July 21, 2016

5:49 AM

Ondeh Ondeh (Sweet Potato Glutinous Rice Ball)


I've made Ondeh Ondeh a few times but somehow each time I made it, it was always last minute decision and I didn't really document the quantity properly.

Actually was craving for ondeh ondeh since two weeks ago when I saw several friends posting about it, but couldn't find grated coconut at the wet market nearest to my place.

It was only today when I was exploring another wet market, that I chanced upon a vegetable stall selling grated coconut. Decided there and then to make some, although I had a few things on my agenda.


Making ondeh ondeh is not difficult, there are in fact many websites, blogs and cook books with detail recipes available.

Some of these recipes use an equal ratio of sweet potato to glutinous rice flour, some use a larger quantity of sweet potato, whereas some add a small proportion of tapioca flour to the dough. Some add coconut juice/milk and pandan juice in addition to water to the dough, whereas some add sugar.

Well, as I was in a hurry, I try to simplify things and just use equal ratio of sweet potato to glutinous rice flour, without adding any tapioca flour, coconut milk or sugar.

This time, I used Indonesian sweet potato which is orange colour, recommended by the auntie at the vegetable stall. Indonesian sweet potato is supposedly sweeter than Malaysian ones. But of course, the Japanese varieties whether yellow or purple would even be sweeter. I guess it's up to individual's preference and taste.


For me, the struggle is how much water to add to the dough? Usually the amount of water is just a guide, it depends on whether the sweet potato (after cooked) is moist or dry. Somehow I always ended up adding more water in order to make the dough texture pliable (not too dry, not too soft, just nice to knead). Is it because I steamed the sweet potato instead of boiling it?


Next difficult part, is wrapping the tiny ball of gula melaka into the centre of the dough, making sure the dough covers the gula melaka properly, otherwise the syrup will leak when cooking the rice balls.

I like to make small ondeh ondeh which can be pop into the mouth easily, about the size of small fish ball which makes wrapping of the gula melaka into the dough more difficult. The weight of the dough is about 10-11g, whereas the gula melaka is about size of chickpea, about 2g probably.

Not exactly sure what's the correct proportion of dough to gula melaka; the guide is not too much dough, else too little gula melaka filling or if too little dough, the filling will risk leaking. Well, I'm quite clumsy and somehow my dough is slightly thicker. More practice is needed I guess. But I don't mind lah coz I like chewing on the ondeh ondeh and prefer slightly less gula melaka syrup which would otherwise be too rich and sweet for my palate (can't take too much sweet stuff).


Ondeh Ondeh (Sweet Potato Glutinous Rice Ball)
(makes about 40 pcs)

Ingredients
170g sweet potato (weight after peeling the skin)
170g glutinous rice flour
80g water (add more if necessary, depends on moisture level of steamed sweet potato, most of the time I used more, even double amount)
80-100g gula melaka

80g grated coconut
1/8 tsp sea salt
2 pandan leaves, cut into small pieces

Steps
  1. Peel and slice the sweet potato into thin pieces. Steam the sliced sweet potato for about 15 mins till very soft. Once done, remove from heat and set aside to cool slightly.
  2. Toss grated coconut, salt and pandan leaves in a tray and steam for 10 mins. Once done, remove from heat and set aside to cool.
  3. Mash the cooked sweet potato till smooth. Add glutinous rice flour. Gradually add water till the mixture comes together and form a dough. Continue kneading till dough is pliable and soft.
  4. Grate the gula melaka into small pieces and set aside.
  5. Weigh about 10-11g of dough, roll into ball and made an indent with the thumb. Fill with about 2g of gula melaka (about size of chickpea) and close up the dough ball. Repeat till all dough and gula melaka used up.
  6. Bring a pot of water to boil then lower heat to a gentle simmer. Add the dough balls into the pot, stirring gently to prevent them from sticking to the bottom of the pot.
  7. Once the balls float, they are ready. Drain and roll the cooked balls over the tray of grated coconut.
  8. Ready to be served. The ondeh ondeh is best eaten immediately and within the same day.

The hb likes ondeh ondeh very much and ate almost half of the whole lot after dinner! Which means that I passed his taste test =D

As for me, I ate quite a few as well :p, more than my daily quota of sweet stuff. I guess I can make this once in a while or whenever I have cravings again :)

Friday, July 15, 2016

6:12 AM

Hokkaido Bake Cheese Tart III

Hokkaido Bake Cheese Tart Part I 
Hokkaido Bake Cheese Tart Part II
Hokkaido Bake Cheese Tart Part IV

I BAKED SOME YUMMY, GOOEY HOKKAIDO BAKE CHEESE TARTS TODAY! THEY WERE SO GOOD! *pardon my hysteria, haven't bake/eat it for more than 2 months :p
 
Talk about my love-hate relationship with it, so sinfully delicious, so *ahem* fattening! LOL!

Actually the tarts were specially made for my dear friend WH, and naturally I had to test them to make sure they were good enough right? #excusetoindulge


Anyways, the reason why I'm writing yet another post is because I tweaked the recipe again, or rather changed proportion and try out a few different ingredients. This time, I also attempted a larger quantity. Like I mentioned before, the recipe is quite forgiving and versatile, easy even for beginners. I could declare this because I have friends and blog readers who tried and succeeded. Even if they don't get it perfect the first time, they were good enough, just need a little more practice :)

That said, the recipe received quite some attention and I'm really pleased to be able to share my joy and experience in baking them. Along the way, I also received many questions and I tried my best to answer them. There are some frequently asked questions which I will highlight in this post and hopefully be of help to anyone who like to attempt the recipes (1 recipe in first post, 2 recipes in second post and 1 recipe in this post) I've posted.


One question or similar questions frequently asked,
"Can the tart cases be baked a day ahead and stored in air-tight container?"
"Can the cheese custard/filling be cooked a day ahead and stored in fridge?"
"Can the tarts be baked a day ahead and stored in fridge and re-heat?"

Some people wish to prepare the tart cases and cheese filling at least one day before so that on the actual day they just have to assemble and do the final bake; saves time especially when having a party.

So this time, I decided to prepare the tart cases and cheese filling one day ahead as well.
For the cheese filling, I cooked the cheese custard, let it cool down, sieve, transfer to piping bags and store in the fridge.
For the tart cases, I prepared the dough, roll, stamp each piece using cutter and store them in plastic container and place the container in the fridge. *I prefer not to bake the tart cases as the weather is so humid and I worry about them turning soft even though they are stored in air-tight container.

As for re-heating the baked ones, so far I've tried air-fryer and oven for a few minutes (after thawing slightly at room temperature), still ok. Haven't tried microwave, so can't comment on that.

Picture One above, the cheese filling cooked "bain-marie" method, i.e. cooking over a water-bath (*This was a frequently asked question as some people are unfamiliar with this method.) I added the ingredients in a cooking pot and placed the pot into my big size wok. The water in the wok was on low boil, barely simmering. I prefer cooking the cheese custard this way, heat is more evenly distributed and the cooking is controlled without risk of burning the custard (vs if the pot is placed directly over stove to cook). Just cook the custard to the exact consistency you want for your cheese filling. Remember to taste the custard, if necessary, add some sea salt to enhance the flavour, which I did.

Picture Two above, after sieving the cheese custard and it's cooled completely, I transfer it to piping bags (uncut) and store the bags in the fridge. The next day, bring them to room temperature before using (takes 30-45 mins). If using immediately from the fridge, might be a bit stiff to pipe.

Another question frequently asked,
"What type of cheeses can I try?"

The original Hokkaido Bake Cheese Tart combines three types of cheeses, two from Hokkaido and one French. So I thought mixing a few types of cheese to try. Actually there's no hard and fast rule about the type of cheeses, so far I tried a few combinations, all worked well. Obviously cream cheese is necessary but if only cream cheese, the taste might be a little flat? I avoid hard cheeses because I don't know how well they melt.

I used two types of cream cheese, Philadelphia and Kiri.
Philadelphia is like a standard cheese in baking cheesecake and is saltier (actually I don't like it very much because some batches can be a little grainy and I had to either use a very fine sieve or sieve the custard two times to get smooth texture).
I like Kiri cheese very much (so does my son), it's very soft, creamy and not to salty. I think some Japanese also like to use it to bake. Too bad it's so expensive. When there's a sale (sometimes NTUC has sale), I will try using all Kiri cream cheese!

I also use mascarpone because of it's texture, it's very creamy, taste is very light. As I make chantilly cream often, mascarpone is sort of a staple in my fridge.

Previously I used Japanese brand sliced cheddar and parmesan that I bought overseas. Since I couldn't find them here, I used President's Emmental and Cheddar. There were on promotion :p

For salted butter, any brand is fine, whether SCS or President, or Elle Vire if there's a sale.

One thing I found quite important is milk. I thought using milk from Hokkaido yielded a richer tasting creamier custard. The very first time I bake the tarts, I used Meiji brand milk. Then second time, I tried the Yotsuba milk from Hokkaido ($6.45 at NTUC/Cold Storage) and immediately I could taste the difference in the custard. This time, I bought Milk Land UHT milk, also from Hokkaido (Isetan promo $5 for 1L). Thumbs up!


And like I said, I prepared the tart dough in advance and store them in plastic container like this. Each piece of tart dough is separated by a plastic sheet or baking paper so that they do not stick to each other. Alternatively, the tart dough can be molded into the tart cases and stored. But I don't have enough tart cases and my box is also not big enough.

The next day (or when ready to use), thaw each piece of tart dough slightly before molding them into the tart cases.

Oh, a big shout-out to one of my blog reader, HC who suggested using plain flour or all-purpose flour for making the tart dough (I mentioned in the Part II post that I had trouble managing the dough). When I saw his comment, I had an Ah-Ha moment, oh yah, why didn't I think of it? I usually use plain flour for cookies and cake flour for cakes. Plain flour will make the tart more crunchy. This time, I used back my favourite tart recipe and using plain flour, my tart cases were easy to manage and nice to eat! Thanks HC for the great tip!

These were the tart cases, before (left) and after baking (right). Remember to poke holes at the base. Not necessary to add pie weights, no need to grease the cases. I like my original tart recipe as it's easy and does not puff up or change shape.

Back to the cheese filling, when ready to use, just snipe a hole at the piping bag, about 5-cent big, and pipe into the baked tart cases with one big squeeze, not necessary to swirl or anything. If there's a tiny peak, just use a spatula and gently tap to flatten it.

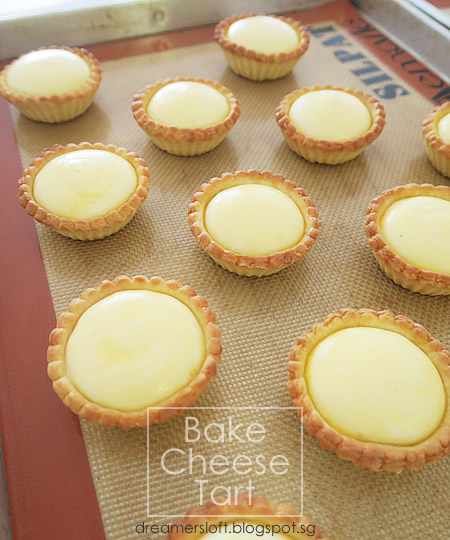
The tarts, before (left) and after (right) baked.

I adjusted the baking temperature slightly yet again. Previously baked at 230 degree celsius (fan mode) for 6-7 mins, but this time, the tarts burnt slightly. So I tried to 225 degree celsius (top and bottom heat) for 10 mins and it worked well too.

Bake Cheese Tart
* makes about 28-30 tarts (depending on thickness), using 7cm fluted cutter/4cm base tart case
* The recipe can be halved

Ingredients

(A) Tart Dough
  • 340g plain flour
  • 68g icing sugar (updated 4 Oct 16, use caster sugar for a more crunchy texture)
  • 170g salted butter, cut into cubes, cold
  • 4 egg yolks (small size)
  • 1 - 1.5 tsp fresh milk
(B) Cheese custard
  • 250g cream cheese (Philadelphia brand)
  • 105g cream cheese (kiri brand, 5-6 pieces)
  • 40g cheddar slice (President brand, 2 slices)
  • 20g Emmental slice (President brand, 1 slice)
  • 130g mascarpone cheese
  • 50g salted butter
  • 260g fresh milk (Hokkaido fresh milk)
  • 78g icing sugar, sifted
  • 30g corn starch, sifted
  • 2 eggs (regular size)
  • 2 tbsp lemon juice
  • 1/2 tsp vanilla extract
  • Sea salt, to taste
  • 1 egg yolk + milk (mixture for brushing on top of custar)
 Steps
  1. Start with tart pastry. Sift plain flour and icing sugar into a large bowl. Add cold salted butter cubes.
  2. Using finger tips, break the butter and rub the butter into the flour mixture, until it resembles bread crumbs.
  3. Add egg yolk to the mixture, use a scrapper to mix the egg yolk into flour mixture.
  4. The mixture will come together and thereafter, use hands to form the mixture into a dough.
  5. Add fresh milk, the dough will become very soft and pliable.
  6. Knead the dough gently into a ball. Place on a piece of clingwrap.
  7. Wrap the dough and place in fridge to rest for about 1 hour.
  8. While waiting, prepare the cheese custard. Add all the cheeses, fresh milk and salted butter into a small pot. Place the pot into a larger pan/pot/wok with barely simmering water. This is the bain marie method, to create a gentle and uniform heat for cooking custard. Keep stirring the mixture till everything is melted.
  9. Once the mixture has melted, add sifted corn starch and icing sugar. Mix till well-blended, the mixture will thicken slowly.
  10. Add eggs, vanilla extract and lemon juice. Mix till well-blended, the mixture will further thicken into custard. Taste the custard and if desired, add some sea salt to increase intensity of cheese taste.
  11. There may be some fine lumps and grainy bits in the custard, sifting will yield a more velvety smooth custard. This is optional. Let the custard cool down completely and transfer to a piping bag. *If preparing custard one day in advance, transfer the custard to a piping bag and store the bag in the fridge till ready to use. Before using, let the custard return to room temperature.
  12. Back to the tart pastry. Remove the dough from fridge. Dust a baking mat (and rolling pin) with flour, roll the dough thinly, about 3-4 mm thickness. Use a 7cm fluted cutter to stamp the dough. *If preparing the dough in advance, store each piece of dough in plastic container, separating with baking paper or plastic sheet in between, then store container in the fridge. Before using, let the dough soften at room temperature slightly.
  13. Use a metal scrapper (dust with flour) to lift up the cut dough.
  14. Place the cut dough over a tart tin (5.5cm top/3cm base) and gently press it downwards.
  15. Using finger tips, gently press and mold the dough into the tart tin. Use a fork to poke holes at the base of the tart cases.
  16. Bake the tarts at 180 degree celsius, fan mode for 10mins. Remove from oven and place on wire rack to cool After the tart cases are cooled slightly, remove them from the tins and let cool completely before use.
  17. Preheat oven to 225 degree celsius top and bottom heat.
  18. Pipe the custard into the cooled tart cases, shape slightly domed. Brush custard evenly with egg yolk-milk mixture.
  19. Bake the tarts at 225 degree celsius top and bottom heat, for 10 mins.
  20. Once baked, remove from oven and place on wire rack to cool. Best eaten warm, freshly baked.


I lined the cheese tarts with cupcake cases and packed them in these window-boxes with cut-in holders meant for cupcakes and I must say they worked really well :)


I'm baking another batch for a gathering this weekend! Yippee, more cheese tarts =D

Monday, July 4, 2016

6:00 AM

Grazing Platter (tomato salsa and avocado yogurt dip recipes)

The weather was insanely hot today and my kitchen felt like a furnace!!

Totally no appetite for any proper lunch so decided to make myself a "grazing platter" which includes homemade tomato salsa and avocado yogurt dip with Tostitos Scoops (tortilla chips), water crackers with Brie cheese, grapes as well as lemon mint soda water.

In fact, this refreshing grazing platter serves as a perfect appetizer or after-dinner snack to go along with wine. Next time when I have guests over, I shall serve this! Looks quite atas doesn't it, especially with the marble serving plate bought from my recent Australia trip.


I must say homemade tomato salsa tasted so much fresher than store-bought bottled ones. Tomato salsa is actually very easy to make at home, just toss together fresh tomato, purple onion, jalapeno, lime juice, fresh coriander, salt, pepper, ground cumin, mixed herbs and sugar. Jalapeno is the harder ingredient to find, I bought them from Cold Storage.

Don't judge it by its size, it is seriously and dangerously fiery hot. I read about how burning and stinking it can be, so was very careful when cutting it by wearing disposable gloves. Unfortunately, totally forgot about the cutting board and swiped my fingers over the board when washing and my fingers burned a fair bit for a couple of hours! Don't add too much to the salsa as well, else the salsa will become too fiery hot to eat.

Besides eating it with tortilla chips, I think it goes well with burrito wraps, quesadilla as well. Shall give it a try next time.


The avocado yogurt dip is even easier to make. Most recipes call for sour cream but I swopped with Greek yogurt since I have a big tub in my fridge. And to make the dip more refreshing, I added mint leaves. Simply blend avocado, Greek yogurt, lemon juice, salt and pepper together till creamy.

This guacamole dip was tangy and creamy yet not overwhelming, perfect with tortilla chips! In addition, I think it can be added to burgers or sandwich as a sauce instead of mayonnaise or Dijon mustard.

Homemade Tomato Salsa
(makes about 1 cup)

Ingredients
  • 2 tomatoes, cut into small cubes
  • 1 small purple onion, finely diced
  • 1/2 pc each of green, yellow and red Jalapeno, finely diced
  • Juice of 1 lime, to taste
  • 1 tbsp coriander or cilantro, finely chopped
  • 1 tsp sugar
  • Sea salt and black pepper, to taste
  • Pinch of ground cumin
  • Sprinkle of mixed herbs
Steps
  1. Mix all the ingredients together. Toss well and adjust flavours to taste.
  2. Best serve cold with tortilla chips or at room temperature with tacos, burritos, quesadillas etc.

Avocado Yogurt Dip (Guacamole)
(makes about 1 cup)

Ingredients
  • 1 ripen avocado
  • 2/3 cup Greek yogurt
  • 10 mint leaves
  • 2 tbsp lemon juice, to taste
  • Maldon coarse sea salt, to taste
  • Black pepper, to taste
Steps
  1.  Add the avocado flesh, yogurt, mint leaves, lemon juice, sea salt and pepper into a blender and blend till smooth and creamy.
  2. Adjust flavours to taste and ready to serve.